

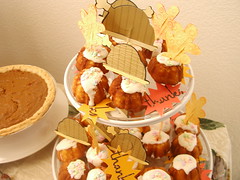
turkey cupcake toppers
Originally uploaded by 4jazznjava
The holidays are a perfect time to use the Cricut Expression. I have to admit, although this holiday season was supposed to be financially tight, don't hate me, but it didn't feel like it at all. A big part of that was because the CE helped me decorate the house and party tables with more flare than ever.
With the CE I was able to have more fun while making a more festive enviroment and stretch my dollar. In fact, I had so much fun, I would have made toppers and decorations even if I wasn't trying to save money. These Thanksgiving cupcakes are a good example. The cupcakes would have been delicious anyway, but the toppers made them memorable.
To make them you need
A cricut expression
Cardstock of appropriate colors
or double sided card stock if you don't have a CE
Doodlecharms cartridge
Opposites Attract
Plaintain Schoolbook
High heat glue gun or double sided tape
Cut 12 turkey shaped diecuts from the doodlecharms cartridge at 2.5 inches.
Then cut 12 more using the flip key function at 2.5 inches.
Use a coordinating paper to cut 12 plate and drumstick ends at the same size. The machine will calculate and cut at the right proportions.
Cut 12 more using the flip function.
Using a clear adhesive, attach the plate and drumstick ends.
Next using the shadow function key, cut 24 turkeys on double-sided black paper.
Now, sandwich the layers. Place one turkey on your hand, behind it place the black shadow diecut. And then, place a turkey diecut in the "flip" for the back.
Use a dry, paper adhesive to attach the the pieces.
Use a hot glue gun to attach a toothpick to the black shadow insert before attaching the "flip" turkey.
Using the same cartridge cut 6 leaves and six more "on the flip".
With the cartridge called Opposites Attract cut 12 thanks in 1.75.
Cut 6 dialogue bubbles and 6 more on the flip. Assemble your pieces.
Have fun, have the kids help, or do it alone with a glass of wine. Enjoy the holidays while making something they will remember. Oh don't forget to take pictures of the product and of you and the kids putting them together. It will be a favorite holiday memory.
